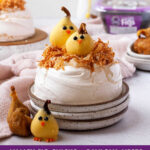
Looking for light Easter desserts or Easter dessert ideas that are festive and delicious? There’s no better dessert to honor the beginning of spring than a pavlova! Read on to learn how to make pavlova nests with Valley Fig chicks.
Spring into Easter Dessert Ideas: Pavlova Nests
If you’re unfamiliar, pavlovas are luscious piles of meringue, baked until crisp on the outside and marshmallow-y soft inside. They’re ephemeral and light, and pair beautifully with citrus and fruit.
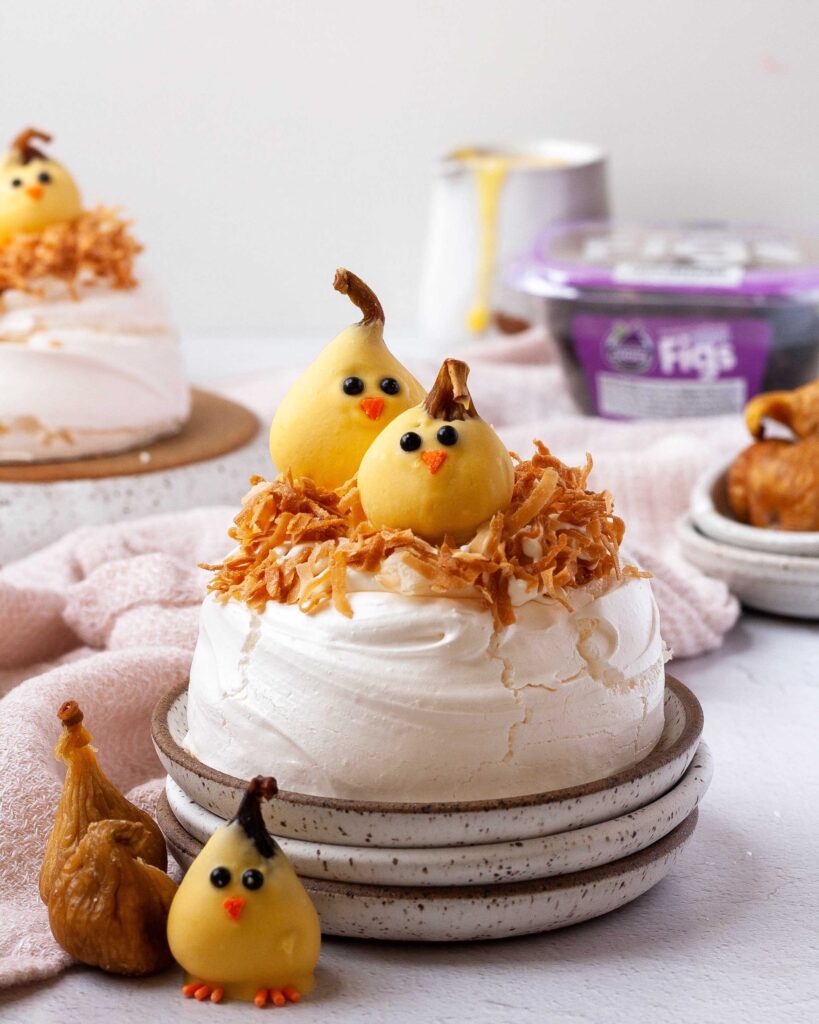
For extra-special Easter dessert ideas, this recipe makes individually sized pavlovas shaped like little birds’ nests.
The nests are then filled with lemon curd, sprinkled with toasted coconut, and topped with Valley Fig dried figs decorated like chicks!
Prep Ahead for These Light Easter Desserts
While there are a number of components to the recipe, all of the pieces are simpler than they look and you’ll be surprised at how quickly it all comes together. You can make the pavlovas, the lemon curd, and the fig “chicks” ahead of time, but I encourage you to wait until the last minute to assemble all of the components for the nicest crispy-creamy textures.
Baking Notes: Read to Succeed before Starting
- The recipe for lemon curd is given below and will use up all of the yolks set aside from making the pavlova. If you don’t want to make curd, feel free to use store-bought!
- The enemy of meringue is fat! Make sure that your mixing bowl, whisk, and spatula are all completely clean. To be extra-sure, you can wipe them all down with a little white vinegar (acid cuts fat!)
- Meringue is unfortunately quite a challenge to make by hand. You’ll need a stand mixer or handheld electric beater for this recipe.
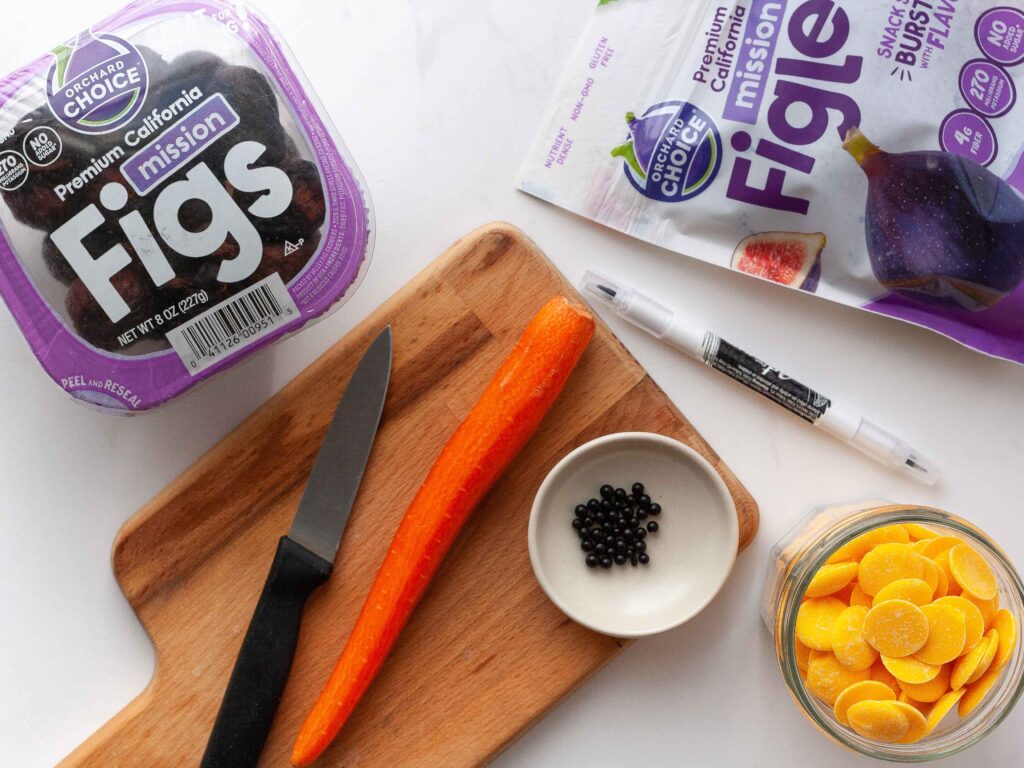
- The Valley Fig chicks can be made with either Orchard Choice or Sun-Maid premium California Dried figs – Mission and Golden Figs both work beautifully. Make sure that you’re choosing well-shaped figs with the stem attached for the cutest figs.
Valley Fig Chicks: How to Decorate (with Multiple Options)
There are several decorating options for the fig chicks listed below. Pick the avenue that works best for you and the tools you have on hand!
For the Valley Fig Chick Feet:
- OPTION A: If you’re using orange sprinkles: Cut the sprinkles into small triangles. After dipping the fig into the yellow chocolate, Lay two orange triangles (sprinkles) close together on the parchment sheet to be the “feet.” Put the dipped fig on top of the orange pieces to seal them together.
- OPTION B: If you’re using 1 carrot or 1 baby carrot: Cut the carrot into thin rounds. Cut each round into small strips. Cut the strips into triangles. After dipping the fig into the yellow chocolate, Lay two orange triangles (cut from the carrot) close together on the parchment sheet to be the “feet.” Put the dipped fig on top of the orange pieces to seal them together.
For the Valley Fig Chick Beaks:
- OPTION A: If you’re using orange sprinkles for the beak: working quickly as the chocolate will dry fast, apply one orange triangle on the fig. This will be the beak!
- OPTION B: If you’re using carrot for the beak, wait for the chocolate to dry before adding the beaks. Dab a tiny bit of melted yellow chocolate on one side of the carrot triangle. Press the carrot, chocolate side first, to the fig!

For the Valley Fig Chick Eyes:
- OPTION A: If you’re using black sprinkles for eyes, apply 2 sprinkles as eyes above the beak once the fig has been dipped in yellow chocolate and placed on the “feet.”
- OPTION B: If you’re using a black edible marker, wait for the chocolate to dry before drawing on the eyes.
- OPTION C: If you’re using black food coloring, wait for the chocolate to dry. Then, using a tiny paintbrush or a toothpick, dab on little spots of black food coloring to form the eyes.
Easter Dessert Ideas: Valley Fig Chicks + Pavlova Nests
Ingredients
Pavlova Nests
- 105 grams egg whites (from 3 large eggs)
- 180 grams granulated sugar
- 1/4 teaspoon cream of tartar
- 1 teaspoon cornstarch
- 1/8 teaspoon fine salt
Lemon Curd
- 55 grams egg yolks (from 3 large eggs)
- 75 grams granulated sugar
- 55 grams freshly-squeezed lemon juice (from 1-2 lemons)
- Zest of 1 lemon
- 30 grams unsalted butter
Valley Fig Chicks
- 10-15 Orchard Choice or Sun-Maid California Dried Figs
- 1 cup yellow candy melts
- 1 carrot or baby carrot
- Edible marker or Black food coloring
Toasted Coconut
- 1/2 cup shredded sweetened coconut
Assembly
- Cooled Pavlovas
- Chilled Lemon Curd
- Valley Fig Chicks
- Toasted Coconut
Instructions
Make the Pavlova Nests
- Preheat your oven to 300F. Line a baking sheet with a sheet of parchment paper.
- Separate 3 egg whites from the yolks. Ensure that the yolks don’t break and deposit fat into the whites! Place the egg whites, sugar, and cream of tartar into a medium-sized heatproof bowl. Whisk well to combine.
- Put about one inch of water into a pot slightly smaller than the bowl. Bring the water to a very gentle simmer. Keeping the water on very low heat so that it is steaming but not bubbling, place the heatproof bowl over the warm water. Stir continuously to gently warm up the egg mixture. Continue heating and stirring, being sure to scrape down the sides of the bowl, until the sugar fully dissolves. This will happen around 110-115F. You can test that the sugar has dissolved by rubbing a little of the mixture between your fingers. If it’s smooth, it’s ready! Remove the bowl from the pot.
- If you have a stand mixer, transfer the egg mixture to the bowl of your mixing bowl. If you’re using a stand mixer, you can keep the mixture in the bowl. Whip the mixture on medium speed for one minute using the whisk attachment, until it is full of tiny bubbles. Increase the speed to high and continue whipping until it reaches stiff peaks, 5-8 minutes. When the mixture is reaching stiff peaks, it will start to ball up in the whisk attachment. When you pull the whisk attachment out of the bowl and hold it upright, a peak of meringue will stand straight up on the top of the whisk without drooping over! Stop the mixer and add the cornstarch and salt. Whip one minute on high speed to incorporate the dry ingredients.
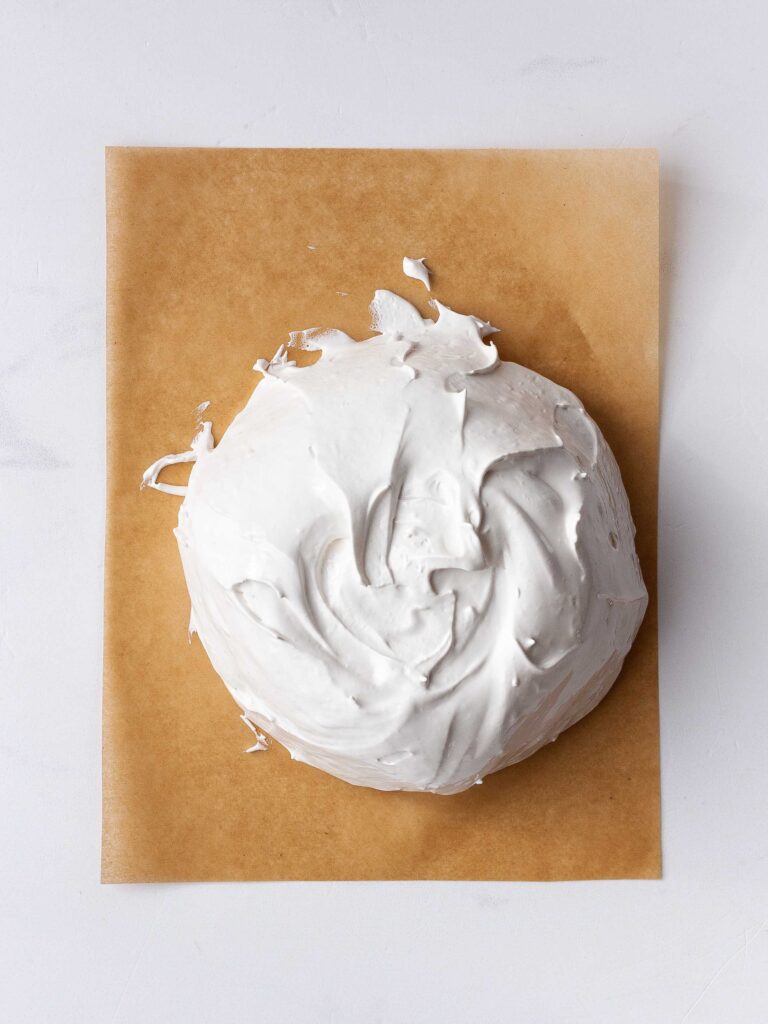
- Using an ice cream scoop or a large spoon, deposit 5 baseball-sized scoops of meringue onto the baking sheet. You’ll use up all the meringue!
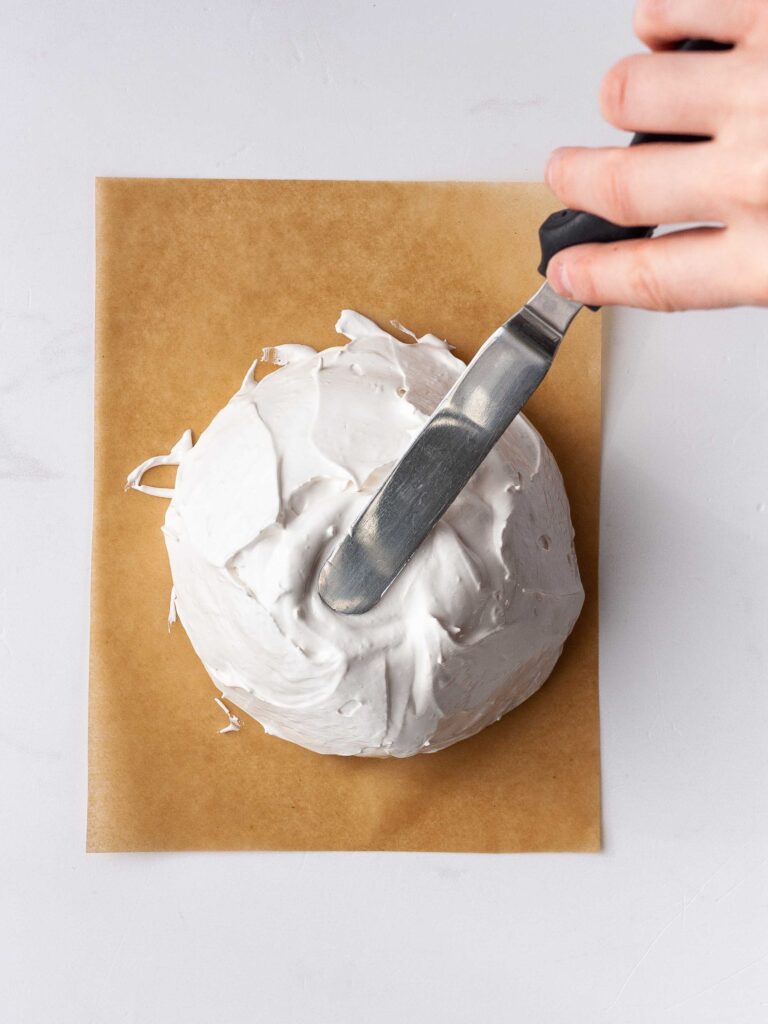
- Use a small offset spatula or the back of a spoon to shape each pile of meringue into a little nest. Drag the spatula up the sides of the pile to nudge them into shape. Once you’re happy with the shape, use the spatula/spoon to form a divot in the top of each nest about 1/2” in diameter.
- Bake the pavlovas in the middle rack of your oven for 30 minutes. After 30 minutes,turn the oven off but don’t open the oven door! Let the pavlovas cool in the oven for at least one hour. The pavlovas will keep, wrapped loosely at room temperature, for up to 3 days.
Make the Lemon Curd
- Combine all the ingredients in a medium-sized pot. Whisk well to combine. Heat the mixture over medium heat, stirring continuously with a spatula. Make sure you’re scraping into the corners and sides of the pot to keep everything well-circulated.
- Heat and stir the curd until it starts to thicken. This will happen pretty suddenly, around 175-180F. If you don’t have a thermometer, test for readiness by lifting the spatula out of the curd. Run your finger through the thin layer of curd on the spatula. If the curd doesn’t run back into the groove you’ve made, it’s ready.
- Pour the hot curd through a fine mesh sieve to strain out any pieces of cooked egg. Cover the curd with a piece of plastic wrap, pressing down onto the surface of the curd to keep a skin from forming. Refrigerate the curd for at least 3 hours. The curd will thicken as it cools. Curd can be stored in the refrigerator for up to5 days.
Make the Valley Fig Chicks
- Prep the beaks and feet: Cut the carrot into thin rounds. Cut each round into small strips. Cut the strips into triangles.
- Put the yellow candy melts into narrow heatproof container. Melt the candy fully, until flowable and smooth.
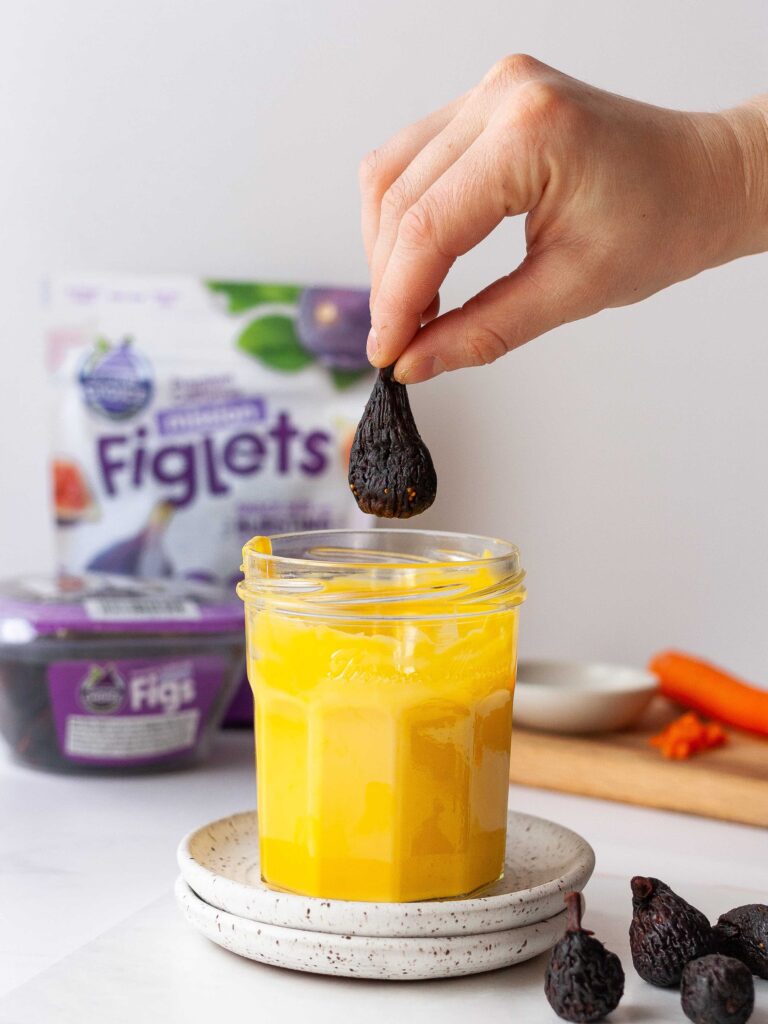
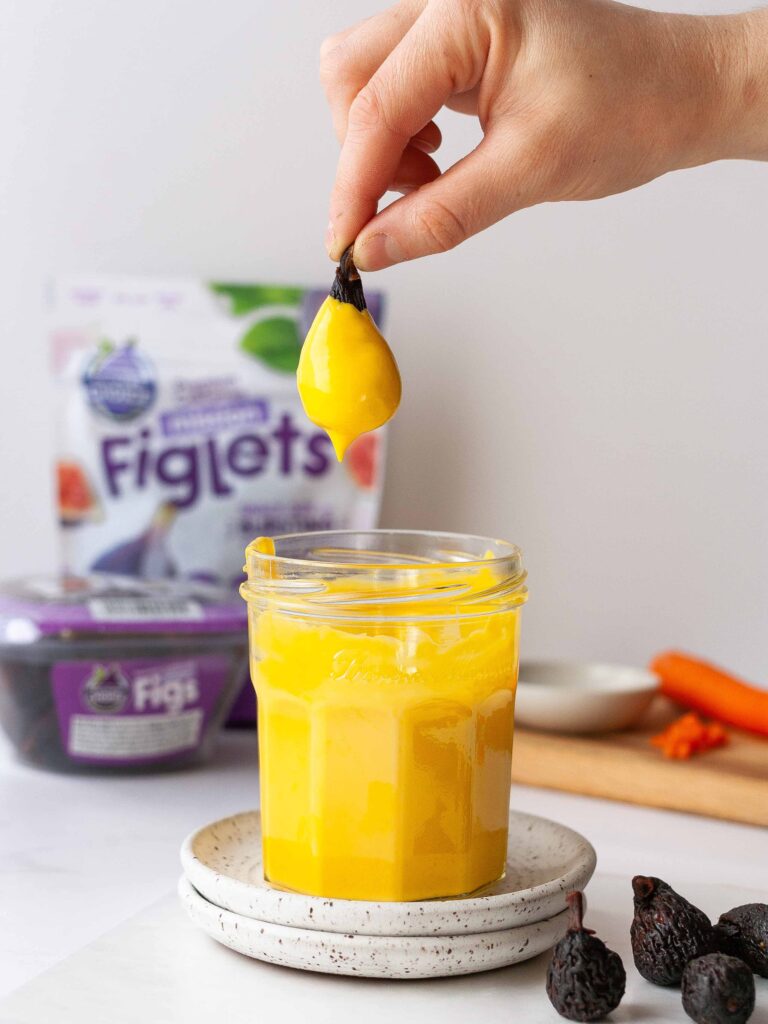
- Lay a piece of parchment paper on your work surface. Holding one fig by the stem, dip it into the yellow chocolate until all but the very top is submerged. Remove the fig from the chocolate and shake it gently to remove excess chocolate.
- Lay two orange triangles (sprinkles or carrot pieces) close together on the parchment sheet to be the “feet”. Put the dipped fig on top of the orange pieces to seal them together.
- If you’re using a black edible marker or black food coloring, wait for the chocolate to dry before drawing on the eyes. If using black food coloring: on a tiny paintbrush or a toothpick, dab on little spots of black food coloring to form the eyes.
- For the beak, wait for the chocolate to dry before adding the beaks. Dab a tiny bit of melted yellow chocolate on one side of the carrot triangle. Press the carrot, chocolate side first, to the fig!
- Let the figs dry fully – this will take up to 30 minutes.
Make the Toasted Coconut
- Preheat your oven to 325F. Place the coconut on a baking sheet. Bake the coconut for 5 minutes, then stir it around. Bake for another 5 minutes, until toasted golden brown. Let cool on the sheet.
Assembly
- Assemble as close to serving as possible! The lemon curd will soften the meringue as it sits. Spoon some lemon curd onto the top of a pavlova, filling the center divot. Top the meringue with 2-3 Valley Fig Chicks. Sprinkle toasted coconut around the chicks and the rim of the pavlova. Enjoy immediately!